

Web Audio API の各ノードの AudioParam 型のパラメータには例えばフィルターノードの frequency やゲインノードの gain など様々ありますが、実は a-rate パラメーターと k-rate パラメーターという 2 種類があります。この違いは処理する頻度にあり、a-rate パラメーターは 1 サンプル単位で反映され、k-rate パラメーターは 128 サンプル毎に反映されます。
a-rate パラメータは元々はあまり多くなく、信号に AM 変調や FM 変調をかけるためのものだけが a-rate に指定されていたのですが、仕様策定が進むにつれ、かなりのパラメータが a-rate で処理される事になっています。最新の仕様ではこれらは automationRate というプロパティによって変更可能ですが、パラメータによっては動作モードによって k-rate になったり a-rate になったりというものも存在しますので、仕様書での確認が必要です。
a-rate の使用方法としては代表的なものが FM 音源です。サンプルとしていわゆる FM 音源の OP1 => OP2 のような変調の場合の例を示します。と言ってもこれは「オレシーターの使い方」の例で出したビブラートを掛ける例とほとんど同じ構成で設定が違うだけです。LFO でゆっくりとビブラートをかけていたものを極端に速くする事で音色の変化を作り出すわけですね。
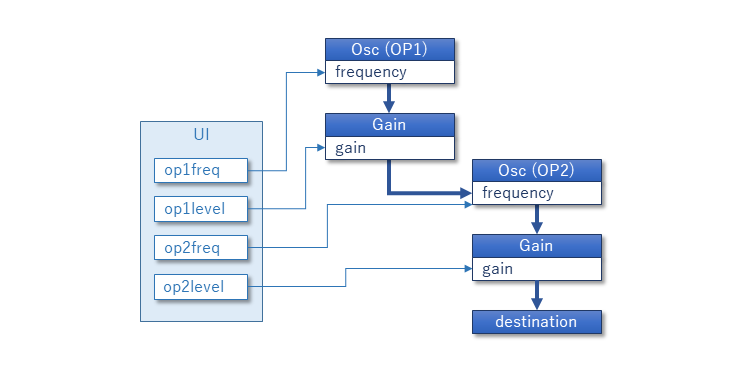
接続は Osc1 => Gain1 => Osc2.frequency => Gain2 => destination となっています。Osc2.frequency の入力の値は Hz 単位ですので Gain1 の gain はかなり高い値にしないと変調の効果がでません。デフォルトの状態で 300、OP2 が 440Hz ですから、140Hz – 740Hz まで振れている事になります。更に大きくしてマイナスの値が含まれるようになってもオシレーターはちゃんと動作します。
<!DOCTYPE html>
<html>
<body>
<h1>FM synthesize Test</h1>
<button id="play">Play</button> <button id="stop">Stop</button>&;lt;br/>
<table>
<tr><th>OP1 Freq</th>
    <td><input type="range" id="op1freq" min="10" max="1000" value="220"/></td>
    <td id="op1freqval"></td></tr>
<tr><th>OP1 Level</th>
    <td><input type="range" id="op1level" min="0" max="1000" value="300"/></td>
    <td id="op1levelval"></td></tr>
<tr><th>OP2 Freq</th>
    <td><input type="range" id="op2freq" min="10" max="1000" value="440"/></td>
    <td id="op2freqval"></td></tr>
<tr><th>OP2 Level</th>
    <td><input type="range" id="op2level" min="0" max="1" step="0.01" value="0.5"/></td>
    <td id="op2levelval"></td></tr>
</table>
<script>
window.addEventListener("load", ()=>{
    const audioctx = new AudioContext();
    let play = 0;
    const op1 = new OscillatorNode(audioctx);
    const gain1 = new GainNode(audioctx);
    const op2 = new OscillatorNode(audioctx);
    const gain2 = new GainNode(audioctx);
    op1.connect(gain1).connect(op2.frequency);
    op2.connect(gain2).connect(audioctx.destination);
    audioctx.suspend();
    op1.start();
    op2.start();
    document.getElementById("play").addEventListener("click", ()=>{
        audioctx.resume();
    });
    document.getElementById("stop").addEventListener("click", ()=>{
        audioctx.suspend();
    });
    document.getElementById("op1freq").addEventListener("input",Setup);
    document.getElementById("op1level").addEventListener("input",Setup);
    document.getElementById("op2freq").addEventListener("input",Setup);
    document.getElementById("op2level").addEventListener("input",Setup);
    Setup();
    function Setup() {
        op1.frequency.value = document.getElementById("op1freqval").innerHTML = document.getElementById("op1freq").value;
        gain1.gain.value = document.getElementById("op1levelval").innerHTML = document.getElementById("op1level").value;
        op2.frequency.value = document.getElementById("op2freqval").innerHTML = document.getElementById("op2freq").value;
        gain2.gain.value = document.getElementById("op2levelval").innerHTML = document.getElementById("op2level").value;
    }
});
</script>
</body>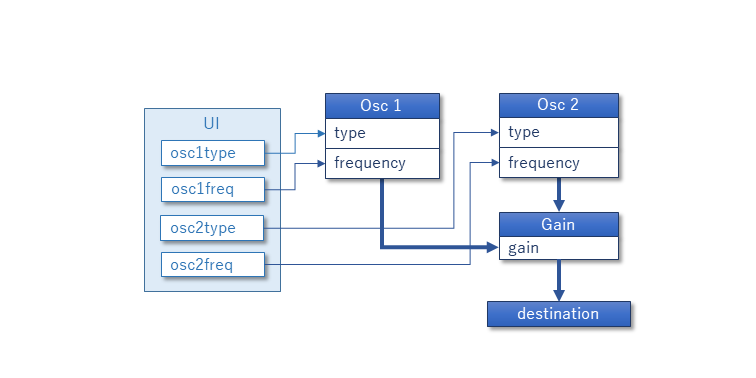
</html>もうひとつの例として gain を使った AM 変調というかリング変調です。gain パラメーターは負の値になった時に極性が反転すると仕様上明記されていますので、ここにオシレーターからの信号を入れる事でいわゆるリング変調を掛ける事ができます。
<!DOCTYPE html>
<html>
<body>
<h1>Ring Modulation Test</h1>
<button id="play">Play</button> <button id="stop">Stop</button><br/><br/>
<table>
<tr><td></td><th>Type</th><th>Freq</th></tr>
<tr>
    <th>Osc-1</th><td><select id="osc1type"><option>sine</option><option>square</option><option>sawtooth</option><option>triangle</option></select></td>
    <td><input type="range" id="osc1freq" min="0" max="1" step="0.001" value="0.5"/><span id="osc1freqval"></span><br/></td>
</tr>
<tr>
    <th>Osc-2</th><td><select id="osc2type"><option>sine</option><option>square</option><option>sawtooth</option><option>triangle</option></select></td>
    <td><input type="range" id="osc2freq" min="0" max="1" step="0.001" value="0.3"/><span id="osc2freqval"></span><br/></td>
</tr>
</table>
<br/>
<script>
window.addEventListener("load", ()=>{
    const audioctx = new AudioContext();
    const osc1 = new OscillatorNode(audioctx);
    const osc2 = new OscillatorNode(audioctx);
    const gain = new GainNode(audioctx, {gain:0});
    osc1.connect(gain.gain);
    osc2.connect(gain).connect(audioctx.destination);
    audioctx.suspend();
    osc1.start();
    osc2.start();
    document.getElementById("play").addEventListener("click", ()=>{
        audioctx.resume();
    })
    document.getElementById("stop").addEventListener("click", ()=>{
        audioctx.suspend();
    })
    document.getElementById("osc1type").addEventListener("change", Setup);
    document.getElementById("osc1freq").addEventListener("input", Setup);
    document.getElementById("osc2type").addEventListener("change", Setup);
    document.getElementById("osc2freq").addEventListener("input", Setup);
    Setup();
    function Setup() {
        const typestr = ["sine","square","sawtooth","triangle"];
        osc1.type = typestr[document.getElementById("osc1type").selectedIndex];
        const f1 = osc1.frequency.value = 20 * Math.pow(250,document.getElementById("osc1freq").value);
        document.getElementById("osc1freqval").innerHTML = f1.toFixed(2);
        osc2.type = typestr[document.getElementById("osc2type").selectedIndex];
        const f2 = osc2.frequency.value = 20 * Math.pow(250,document.getElementById("osc2freq").value);
        document.getElementById("osc2freqval").innerHTML = f2.toFixed(2);
    }
});
</script>
</body>
</html>